Smart Stacks: 17 Bunk Bed Upgrades for Small Spaces That Actually Work
Disclosure : This post may contain affiliate links or paid partnerships. I may earn compensation if you click a link or make a purchase, at no additional cost to you. See my disclosure for more info.
Let’s be honest about what’s happening here.
You’re looking at a room that doesn’t have enough space for the people sleeping in it. You’ve tried rearranging things. It doesn’t help much. And now you’re wondering whether bunk beds are the answer — or just the start of a new set of problems.
Here’s the truth: bunk beds are only as good as the thinking behind them.
An unconsidered bunk bed makes a small room feel smaller. A well-executed one solves problems you didn’t even know you had.
The difference isn’t budget. It isn’t square footage. It’s knowing which moves actually work.
That’s what this is: 17 practical, proven ideas that take a bunk bed setup from serviceable to genuinely excellent. Storage strategies, lighting upgrades, privacy solutions, and design choices that make the whole room feel thought-through.
Let’s get into them.
Why Most Bunk Bed Rooms Fall Short
Here’s the pattern.
The bunk bed goes in. The room is measured. It fits. Done.
But the bunk bed is the biggest object in the room. It sets the visual tone for everything around it. When it’s generic, everything reads generic. When it’s considered, everything improves.
The mistake isn’t choosing bunk beds. It’s treating them as purely functional and then trying to decorate around them.
Treat the bunk bed as a design anchor, and the room starts making sense.
17 Ideas That Actually Solve the Problem
1. Sconces or Clip Lights — One Per Sleeping Level
Mount a dedicated reading sconce on the wall beside each bunk, or clip one to the frame.
This ends the bedtime light argument. Each sleeper controls their own environment without affecting anyone else. That alone is worth the installation.
Beyond the practical benefit, individual lighting transforms each bunk from a sleeping surface into a defined personal zone.
2. Curtain Panels That Give Each Sleeper Enclosure
Thread tension rods across the front opening of each bunk and hang fabric panels.
What you end up with feels nothing like a camp bed. Each bunk becomes a contained retreat. Kids stop fighting over who can see whose screen. Guests feel private rather than exposed.
Lightweight linen is a good default. Heavier fabrics block more sound and light if that matters for a particular sleeper.
3. Paint the Bunk Wall a Bold, Deep Color
Before anything else, paint the wall the bunk bed sits against a deep, saturated shade. Forest green. Slate blue. Warm charcoal.
The bunk immediately looks intentional against it. It stops looking like furniture that needed to go somewhere and starts looking like a feature.
The rest of the room doesn’t need to do much after this. The contrast handles the heavy lifting.
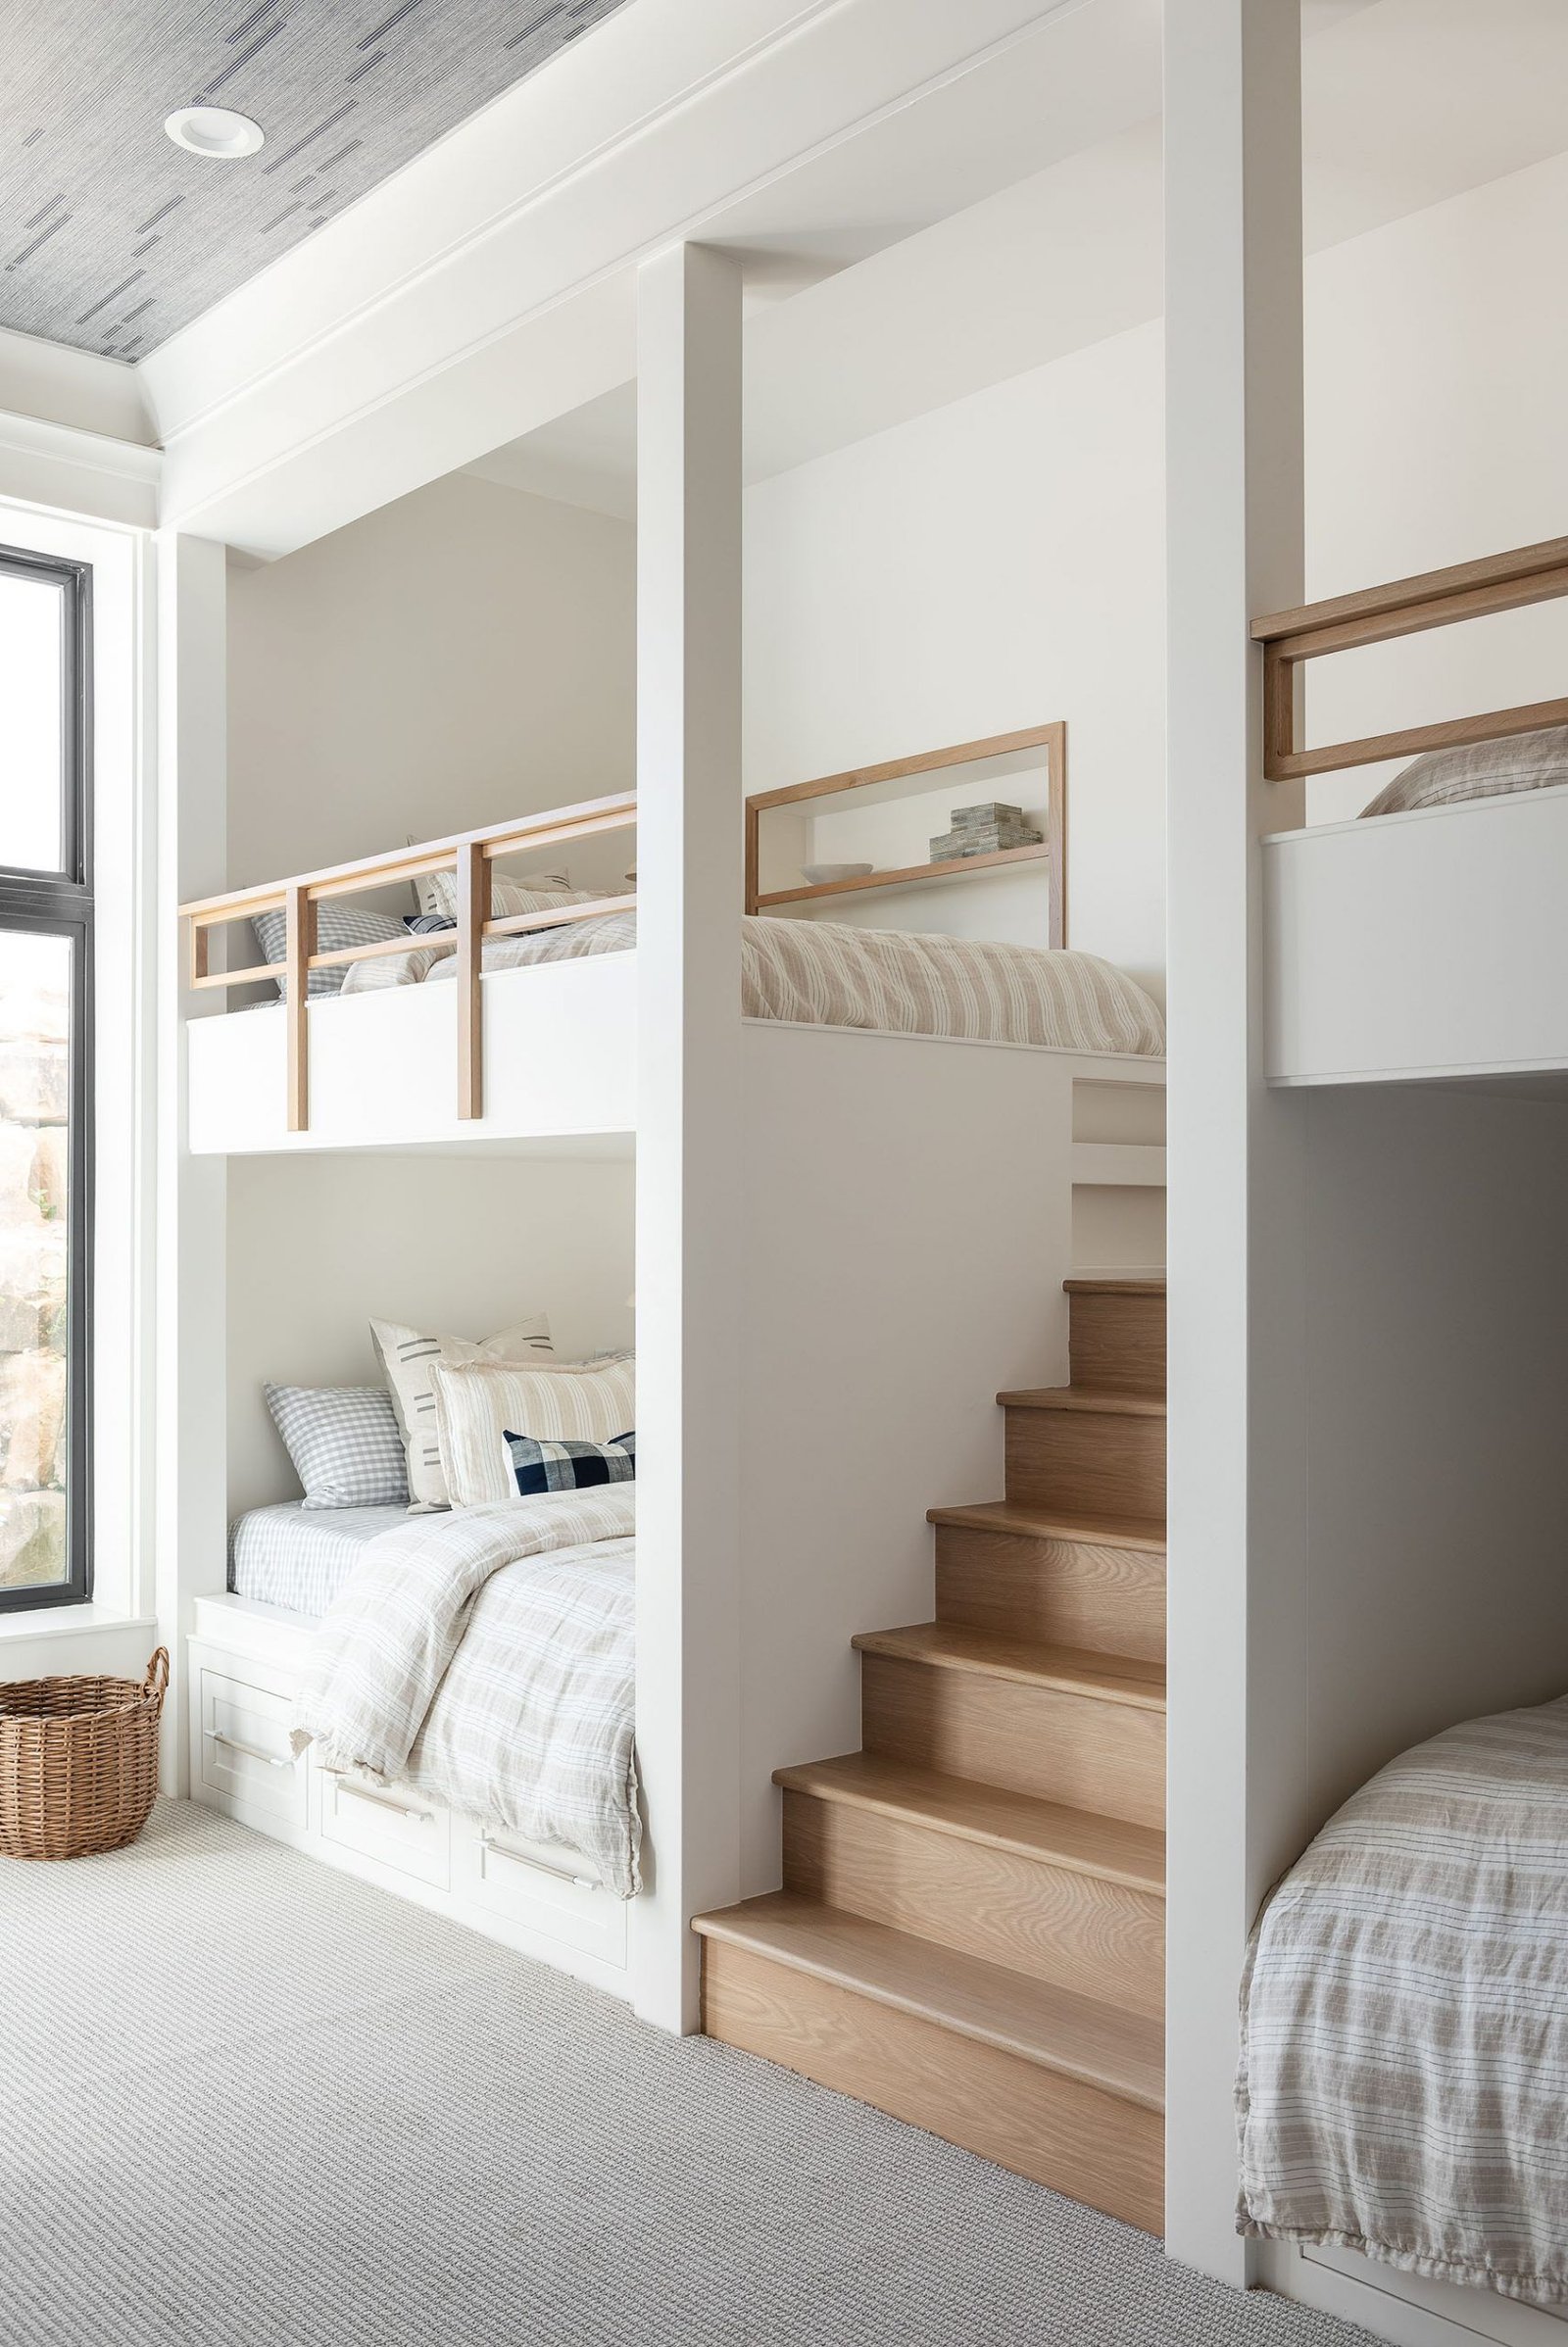
4. Replace the Ladder With Storage Stairs
Every step in a stair unit with built-in drawers is usable storage space.
Socks, books, seasonal clothing, spare linens — they all disappear into the structure of the bed itself. Nothing piles up on the floor. Nothing migrates to the closet.
In a genuinely small room, stair storage isn’t a luxury upgrade. It’s a coping mechanism. A necessary one.
5. Coordinate the Bedding Across Both Levels
Choose comforters and covers with a shared visual logic.
Not identical — related. The same color pulled through two different patterns. A solid on top, a stripe on the bottom, both in the same palette.
When the bedding coheres, the bunk frame reads as one piece of considered furniture rather than two accidental mattresses at different heights.
6. Use the Floor Under the Bottom Bunk
If there’s clearance, slide a rolling trundle or storage drawer beneath the lower bunk.
Extra bed for sleepovers. Extra storage for everything that doesn’t have a home. Either option turns dead floor space into something that earns its keep.
Rolling designs make the unit easy to deploy and retract without rearranging the rest of the room.
7. Give Each Child Ownership With a Name Display
Mount a personalized name sign or initial above each bunk.
For children sharing a room, this is more effective than almost anything else at reducing territory disputes. Each child’s space is labeled. It belongs to them. The room says so clearly.
It’s a small investment. The peace dividend it pays is not small.
8. Wall-Mounted Shelves Replace the Missing Nightstand
Install a slim floating shelf within comfortable reach of each bunk.
A glass of water. A book in progress. A small plant or photo. Everything that would normally sit on a nightstand now lives on the wall, and the floor stays clear.
In a room where every square foot of floor matters, this trade is always worth making.
9. Try an L-Shape Instead of a Direct Stack
L-shaped bunk configurations orient the lower bunk at ninety degrees to the upper one, creating an alcove of open floor space beneath the elevated half.
That space accommodates a small desk, a reading nook, or a storage unit — none of which would fit in a room with a straight stack.
If you have an awkward room shape or corner, this may be the configuration that finally makes the layout work.
10. Wallpaper the Inner Walls of Each Bunk
Cut panels of peel-and-stick wallpaper and apply them to the interior surfaces of each bunk.
A soft geometric. A botanical repeat. A star pattern for the child who wants the top bunk specifically because it feels like the sky. Each sleeper gets a micro-environment tailored to them.
Because the wallpaper is removable, you can swap it out whenever tastes change. And because it’s contained within the frame, you can go much bolder than you’d dare on a full wall.
11. Install LED Strips Under the Top Bunk
Run a strip of low-voltage LED lights along the underside of the upper frame.
This gives the bottom bunk a warm, ambient glow without requiring a lamp on any surface. It’s cozy rather than clinical. Enough light for reading, and more than enough for navigating at night without switching on the overhead.
Wireless, battery-operated strips install in minutes with no wiring required.
12. Add a Slide for the Kids Who Hate Mornings
A slide exit off the top bunk turns waking up into something children actually look forward to.
It demands more lateral space than a ladder, so confirm the measurements before committing. But among the things that reduce morning friction, few are as reliable.
Most slide add-ons are designed to detach once the novelty fades. Which means you’re not permanently committed.
13. Build a Work Zone Under a Loft Bunk
A loft bed elevates the mattress and frees the entire lower zone for practical use.
A proper desk setup — task light, corkboard, storage shelf — fits comfortably in that cleared space.
For a teen or a studio apartment dweller, this configuration essentially adds a room within the room. The productivity and storage gains are significant.
14. Hang Woven Storage From the Frame
Hook a macramé basket or woven organizer onto the side rail of the upper bunk.
It collects the small items that accumulate on every sleeping surface — books, chargers, toys, glasses — and keeps them accessible without requiring a surface.
It also introduces texture that makes the frame look warmer and less institutional. A detail that earns its place twice over.
15. Mix Frame Finishes for a Curated Look
Matching frames are the safe choice. Complementary finishes are the more interesting one.
A natural wood upper above a painted or metal lower adds depth and suggests that the room was assembled with some attention to aesthetics.
Anchor the contrast with a shared element — the same hardware tone, or bedding that bridges both finishes — so the combination reads as considered rather than accidental.
16. Hang a Canopy Above the Top Bunk
Suspend a sheer fabric panel from ceiling hooks above the upper sleeping level.
The top bunk stops being an exposed platform and becomes something more like a personal canopy bed. The enclosure feels protective without being claustrophobic, particularly when you use a light, translucent fabric.
For children, this is often the detail that makes the top bunk the desired bunk.
17. Lock In a Three-Color Palette and Commit to It
This is the discipline that makes everything else work.
Decide on three colors maximum and apply them consistently across the frame, the bedding, the wall, the shelves, and the accessories. No additions. No exceptions.
A small room with too many colors feels restless. The same room with a tight palette feels resolved. Even bold palettes — rust, sand, deep teal — create calm when applied with consistency.
The One Mistake That Undoes Everything
You’ll recognize this pattern immediately.
The bunk bed goes in to save space. Then the saved space gets filled.
A large dresser. A freestanding bookcase. A bean bag that seemed like it would fit and technically does but really doesn’t.
The efficiency you gained evaporates. The room feels crowded again. And now it also has bunk beds.
Don’t fill the space you freed. Let the bed’s built-in storage — the stair drawers, the wall shelves, the trundle — handle the load. Keep the floor open. That open floor is the actual deliverable.
Limited Space Is a Specific Problem With Specific Solutions
The best-designed small rooms in the world feel far larger than their dimensions suggest.
That’s not an accident. It’s the result of every element earning its place. Nothing there by default. Nothing without a purpose.
You can build that room.
You don’t need more space. You need a plan that fits the space you have. These 17 ideas are that plan.
Pick the ones that solve your most pressing problems first. Install them. See what changes.
Because a room that works well isn’t about size.
It’s about decisions made with intention.
Start making them.