21 Budget-Friendly DIY Plant Stands You Can Actually Build This Weekend
Disclosure : This post may contain affiliate links or paid partnerships. I may earn compensation if you click a link or make a purchase, at no additional cost to you. See my disclosure for more info.
You love your plants.
The lush fiddle leaf in the corner. The trailing pothos by the window. The trio of succulents you couldn’t resist at the farmers’ market last Saturday.
What you don’t love is where they’re living right now.
On the floor. Shoved along the baseboard. Looking like they belong in a storage unit, not a living room.
Or crammed onto the windowsill between a forgotten candle and a stack of charging cables.
Or wobbling on a stack of books that definitely can’t handle another watering session.
You’ve seen the plant stands in stores. You know what you want.
You also know the prices are absurd.
Sixty dollars. Eighty dollars. A hundred dollars for four pieces of wood.
So you walked away. Again.
Your plants stayed put. Your space stayed mediocre.
Here’s the practical truth: you can fix this for under twenty dollars per stand, most of them under ten, using materials from any hardware store or thrift shop.
No special skills. No expensive tools. No wasted weekend.
Just twenty-one actual projects you can complete and display this weekend.
Here they are.
1. The Painted Thrift Store Step Stool
Head to the nearest thrift store, Goodwill, or estate sale.
Find any small wooden stool — a step stool, a milking stool, a piano bench, whatever’s available.
Lightly sand any rough spots. Apply one or two coats of paint in any color that suits your room. Let dry completely.
Place plant on top. Done.
Total cost: usually under five dollars. Result: a plant stand with genuine character that no box store can replicate.
Bonus: the existing nicks and scratches become selling points, not flaws.
2. The DIY Copper Pipe Tripod Stand
Visit any hardware store’s plumbing section.
Buy three short lengths of copper pipe and three elbow connectors. Pick up a small round wood disc at the craft store.
Connect the three pipes into a tripod using the elbows. Secure the disc on top with adhesive. Allow to set.
Assembly time: approximately twenty minutes. No power tools required.
The warm copper against green leaves is a pairing that works in every style of interior from industrial loft to boho cottage.
3. The Hairpin Leg Round Top Stand
Order a set of four hairpin legs online — they’re inexpensive and widely available.
Buy a circular wood blank or cut one from a board. Pre-drill the mounting holes and drive the legs in with the included hardware.
That’s the entire build. You now have a mid-century style plant stand for well under fifteen dollars — one that sells for sixty at West Elm.
Optional finish: a coat of walnut stain on the wood top brings out a rich, expensive-looking contrast with the metal legs.
4. The Stacked Wooden Crate Shelving Unit
Source two or three small wooden crates from craft stores, thrift shops, or grocery stores.
Stack them vertically with alternating open faces — one faces front, the next faces side, and so on.
Each open compartment holds one plant. You get instant height, dimension, and a built-in multi-pot display.
Paint all crates the same color for a polished modern look. Leave natural for a farmhouse feel. Either way, this project costs under fifteen dollars total.
5. The Basic Macramé Plant Hanger
Pick up a bundle of macramé cotton cord — it’s cheap and available at any craft store.
A beginner-friendly plant hanger uses four basic knots, repeated in a pattern. Any video tutorial covering the square knot is all you need to learn.
Total build time for a beginner: sixty to ninety minutes.
The payoff: a hanging plant display that uses zero floor space and adds significant visual texture to any bare wall or ceiling hook.
Especially effective in apartments where floor square footage is at a premium.
6. The Spray-Painted Cinder Block Riser
Cinder blocks cost almost nothing at any masonry or hardware outlet.
Buy one. Tape off the holes if preferred. Spray the exterior surface with matte black, white, or terracotta paint.
Let dry for thirty minutes. Set your pot on the flat top surface.
The industrial-organic contrast — rough concrete supporting soft organic greenery — is a legitimate design technique. Interior stylists use it deliberately.
You achieved it for two dollars and a half hour of drying time.
7. The Reclaimed Ladder Plant Shelf
An old wooden ladder leaning against a wall functions as a ready-made multi-level plant display.
Each horizontal rung can hold a pot. Taller plants go lower, trailing plants go higher to cascade down.
Can’t find an old ladder? Build a simple version: two 1×2 planks, four or five short wooden dowels, and a drill. Takes about forty-five minutes and a trip to the hardware store.
Works especially well in hallways, entryways, or beside a sofa where vertical height is the only available real estate.
8. The Spray-Painted Tomato Cage Pedestal
Buy a standard wire tomato cage from any garden center — they cost almost nothing.
Flip it upside down so the widest ring faces up. Spray paint entirely in one solid color — matte black, gold, and bronze all look sharp.
Allow to dry fully. Rest a pot on the wide upper ring.
The wire structure below creates a light, airy, cage-like silhouette that looks far more considered than it should for the price and effort involved.
9. The Hot-Glue Jute Can Planter
Keep your next large tin can instead of recycling it.
Starting at the base, apply a thin line of hot glue and begin wrapping jute twine in tight rows all the way to the rim.
Total time: ten to fifteen minutes per can.
Total cost per can: essentially zero if you already have twine.
Result: a textured handmade planter that passes for an artisan market purchase without the artisan market price tag. Make several and group them for maximum impact.
10. The Minimalist Floating Plant Shelf
Install a single floating wall shelf at eye level in a spot that needs some life.
Place one plant on it. Nothing else.
This is intentional minimalism — the open wall around the plant acts as negative space, making the plant itself the focal point. It’s the same principle a gallery uses to display a single painting.
Works brilliantly in bathrooms, kitchens, and bedrooms where floor and counter space is already spoken for.
11. The Live-Edge Wood Slice Stand
Search Facebook Marketplace, Etsy, or lumber yards for a thick tree trunk cross-section.
Sand the top face smooth with 120-grit paper, then 220-grit for a final smooth pass. Leave the natural bark edge intact. Seal with one coat of clear polyurethane.
Every single piece is completely unique — the grain, the ring patterns, the silhouette differ from every other piece ever cut.
It’s the one plant stand that no two people will ever have in identical form. That alone is worth the small effort.
12. The Flexible Pegboard Display System
Attach a pegboard sheet to your wall using spacers to allow for hook depth.
Insert pegs and small shelf brackets in whatever configuration suits your current plant collection.
The system offers total configurability — move items whenever you want, add to it monthly, or completely rearrange in an afternoon with no wall damage and no new holes.
It scales with your collection indefinitely, making it one of the most future-proof investments on this list.
13. The Hollowed Chair Plant Perch
Got a damaged chair with a broken leg or split seat frame? Don’t trash it.
Remove or carefully cut out the seat panel, leaving the frame and legs intact. Set a potted plant — ideally something trailing — into the empty seat frame.
Let the vines drape down over the legs and rungs.
It reads as artistic and intentional rather than makeshift. Repurposing furniture as a planter display is one of those ideas that routinely stops guests mid-conversation.
14. The Graduated PVC Pipe Cluster
Purchase a length of PVC pipe and cut it into sections of five different heights using a saw or pipe cutter.
Use adhesive to affix small wood discs to each top. Spray paint the entire collection one consistent color — white, black, and warm gray all work well.
Arrange by varying the heights: tallest at the back, mixing short and medium toward the front.
The result is a coordinated sculptural plant grouping that looks nothing like PVC pipe.
15. The Handmade Wire Geometric Plant Frame
Buy a coil of thick gauge steel or aluminum wire from a craft or hardware store.
Use pliers to bend the wire into a three-dimensional geometric shape — a cube and a triangular prism are the most forgiving shapes for beginners.
Place your pot inside the finished frame.
The structured geometric outline against the organic plant form creates a compelling visual contrast that looks purposeful and design-forward — and retails for far more than the cost of the wire.
16. The Inside-Window Plant Ledge
Measure your window frame’s interior width. Cut or order a narrow shelf board to fit snugly across the inside sill.
Mount it with two small brackets. Line with small pots.
Plants positioned directly at a window receive dramatically more natural light than plants even two feet back from the glass. For light-hungry herbs and succulents, this can make the difference between thriving and just surviving.
Plus, the window becomes a living green installation visible from both inside and outside.
17. The Wheeled Three-Tier Plant Cart
Buy a basic three-tier rolling utility cart — they’re widely available and affordable.
Load each tier with plants. Roll it to whichever window gets the best light at a given time of day or season.
This solves a genuinely common problem: the plant that needs more light than any fixed position in your home can comfortably provide. With a rolling cart, you bring the light to the plant — or more accurately, you bring the plant to the light, daily if needed.
A simple, practical solution dressed up as stylish home décor.
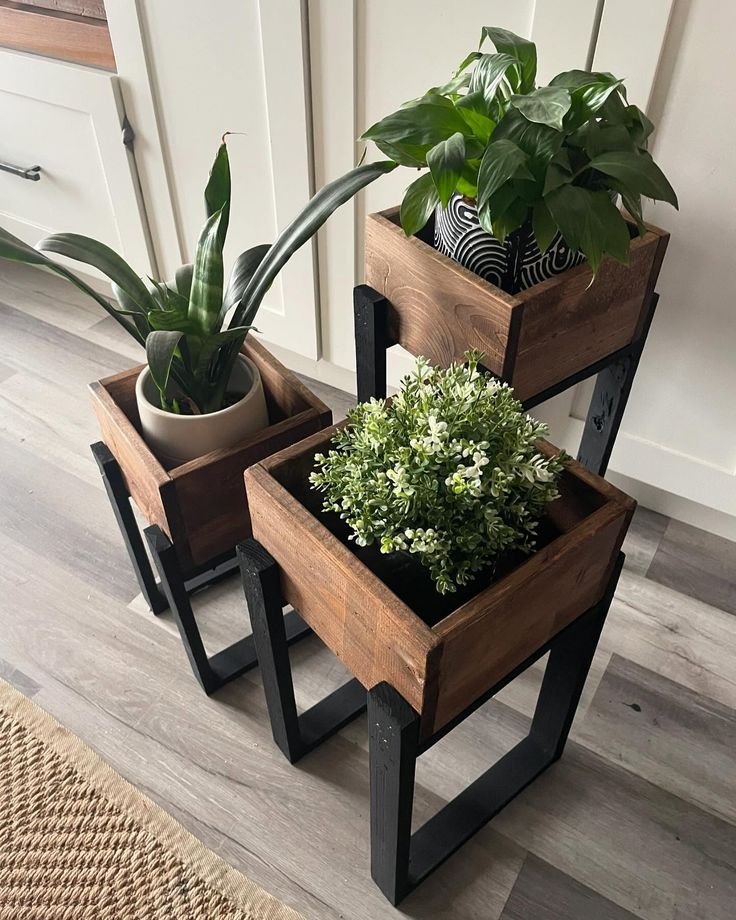
18. The Recessed Wall Box Plant Frame
Cut four pieces of scrap wood to create an open-fronted box roughly six inches deep. Assemble with wood glue and finishing nails. Sand smooth and paint or stain as preferred.
Mount directly to the wall with picture-hanging hardware or small L-brackets.
Place a small pot inside the box opening. The depth of the box creates a natural frame and shadow effect that draws the eye inward toward the plant.
Hang three in a line for a gallery wall effect that uses actual living material instead of art prints.
19. The Elevated Basket-in-Stool Display
Pair a woven basket planter with a low wooden stool.
Drop the pot inside the basket. Set the basket on the stool.
Three layers — stool, basket, plant — create a depth and visual complexity that single-piece solutions simply can’t match.
The stool adds height. The basket adds texture. The plant adds life. Each element does exactly one job, and together they create something that looks curated rather than assembled.
20. The Repurposed Fruit Basket Hanging Garden
Find a tiered hanging wire basket — the kind meant for produce storage in a kitchen.
Replace the fruit with small plants.
Hang near the best light source in your home. Each tier holds a different species, creating an instant vertical garden.
The real practical win: this display occupies no floor space, no counter space, and no shelf space. The only real estate it claims is ceiling space — which was doing absolutely nothing for your room anyway.
21. The Deliberate Book Stack Plant Base
Select four to six hardcover books with visually coordinating or contrasting spine colors.
Stack them in a neat, even column in a spot where height is needed. Place a saucer directly on the top book to catch any drips. Set your pot on the saucer.
In a reading corner, home office, or study, this integrates seamlessly — books and plants sharing space the way they naturally belong together.
The critical difference between “messy pile” and “intentional display” is the evenness of the stack and the deliberateness of the book selection. Spine colors that coordinate make it look planned. Random assorted spines make it look abandoned.
The Proportion Rule That Makes DIY Look Professional
There’s one principle that determines whether your DIY stand looks like a finished design project or a work in progress.
It’s not the quality of the materials. It’s not the complexity of the build.
It’s scale matching.
A tiny plant perched on a massive pedestal looks lost. A huge, heavy plant on a delicate stand looks unstable and wrong.
The visual weight of the plant and the visual weight of the stand should feel balanced. A dense, spreading monstera needs a solid, stable base. A small succulent or air plant needs a light, minimal structure.
Get this right and your DIY stand will look intentional. Get it wrong and even a well-built stand will look off.
Why Most People Never Actually Build Anything
You made it through all twenty-one ideas. A few of them probably sparked something.
But here’s the pattern most people fall into.
Saving without doing.
The article gets bookmarked. The images get pinned. The tab stays open in the browser for three weeks. And eventually the moment passes, the tab closes, and nothing changes.
Your plants stay on the floor. Your room stays uninspired.
This is the only real obstacle between you and a space that looks the way you’ve been imagining it. It’s not budget. It’s not skill. It’s the decision to actually follow through.
The Only Next Step That Matters
Scroll back up. Pick one idea.
One that you genuinely think you can pull off this weekend.
Write down what you need. Go get those two or three things. Set aside ninety minutes. Build it.
Put the plant on it. Step back.
You’ll notice the difference immediately — not just in the room, but in how the room makes you feel. Because you built something with your hands and placed it with purpose.
That’s what separates a space that feels lived-in from one that feels truly yours.
Your plants are ready. Your weekend is ready.
The only thing left is for you to start.
Go build it.